Where To Start Capturing Packets

Whether you’re a network engineer or security analyst at some point you’re going to need to dive into the packets to help solve a problem.
Story Time:
Shortly after I earned my CCIE I was faced with a packet analysis challenge. I was on-site visiting with some team mates who managed a customer’s network. A user at a site was complaining: “the network is slow”. My team has been working with this site for a few days checking all the routing and devices in the network path, testing traffic from all the network devices and more. The user was still having issues and sent a packet capture from their workstation to my team. I started shoulder-surfing as soon as I saw Wireshark open on their desktop. They were hoping their freshly minted CCIE coworker could quickly help them out. The problem was, I had no idea what I was looking at. There I was, the most certified person in the room, and no idea how to begin to properly analyze this packet capture to help narrow down where or what may be causing network performance issues. This was embarrassing for me. I wanted to make sure that anytime someone gave me a packet capture to analyze that I had a strategy, and an understanding of what something should look like under optimal conditions. This started my packet analysis journey.
Packet Acquisition
“Packet Acquisition” is the process and/or tooling used to acquire the packets or ‘actually capturing them’. There are countless blogs and articles about the TAP vs. SPAN arguments. This is not that.
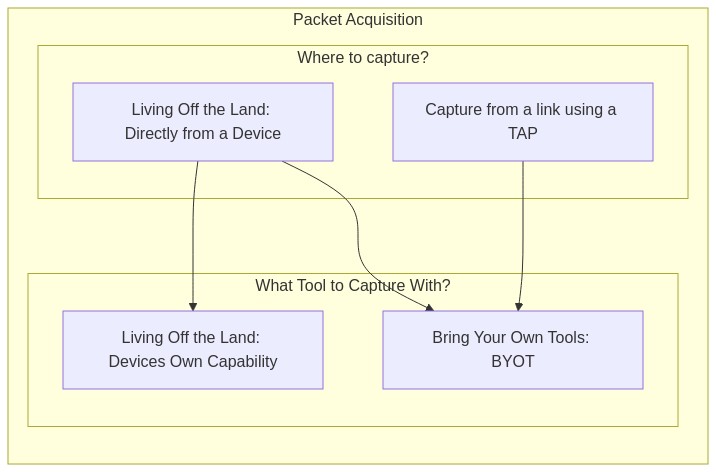
Before you can acquire the packets you should answer 2 basic questions:
- Where to capture from?
- From a link using a TAP
- Directly from a device
- What tool to capture with?
- The devices own capture capability
- B.Y.O.T. (Bring Your Own Tools)
Where to Capture
In order to know “where is the best place to capture traffic” you’ll need to understand what it is you’re looking for and where that traffic flows. It wouldn’t do you any good to capture from a device or a link that your traffic doesn’t pass through. Sometimes, the best place isn’t an option for you, so you’ll also need to be prepared to capture from a less than ideal alternative location while still gathering the data you need to perform analysis or prove your hypothesis.
NOTE: This blog post makes some assumptions about your work experience, knowledge and understanding of networks and network traffic.
The answer to: “Where is the best place to capture traffic?” is relative, as different places throughout the network can give different vantage points. Regardless, if it is the best place or not, your choices will fall into 1 of two categories:
- Strategic placement of a TAP or visibility sensor
- Living off the Land (LoL)
Strategic TAP/Sensor Placement
Placing a TAP or a sensor exactly where you want in the network is the most ideal situation.
Examples of strategic TAP/Sensor placement:
- In front of a server where all users are experiencing delays.
- In front of a printer that frequently is ‘unreachable’.
- South of a FW to have visibility into East-West traffic.
- Between a FW and Router to have visibility on all the North-South traffic.
Using a network TAP/visibility sensor is optimal because it provides the true view with the true delay of exactly what is on the wire. This method is absent of other computationally expensive processes that can occur when you have to Live off the Land. This is especially important when diagnosing issues related to delay and timing. Many high end servers have specialized NICs with additional features or functions designed to ‘lighten the load’ on the processor. This can be a disadvantage when capturing directly from a device and trying to get the ‘true view’ of the packets in flight. For this reason capturing from a link with a TAP in-line is a superior choice.
Living off the Land
“Living off the land” is a phrase meaning: using a devices built-in capture capability without any additional tooling.
In a typical enterprise network there are networking components like: routers, switches, firewalls and more. There are also end-points and workstations. Most of these devices have some packet capturing capabilities built in. Capturing from each of these devices is a little different and can yield slightly different packet captures, each with their own view of the traffic, which can result in multiple-truths. As a network engineer or security analyst, it’s your job to understand the concept of multiple-truths and apply that to your analysis of the packet captures.
Multiple-Truths:

I love this image. I use it all the time. Multiple things can be true regarding a single issue and it’s only a matter of perspective.
Examples of Living off the Land:
- Using the packet capture capability of the router
- Leveraging the SPAN/Mirror port of a switched infrastructure
- Using tcpdump/wireshark directly on the end-host/server
Ultimately deciding “where to capture” becomes a logic exercise between what you want to see and where you can see it from. The bottom line is:
Having /a/ PCAP is better than no PCAP!
What to Capture With?
Depending on whether you are strategically placing a TAP/sensor or Living off the Land, might pre-determine the tools you use to capture the packets. For example, if your capture point is a Cisco router, you might be limited to using Cisco’s Embedded Packet Capture. On the other hand if you are placing a TAP between 2 devices and capturing using a fully featured operating system, you’ll likely have many tools available to you.
Living Off the Land: Routers
Most routers have some way to capture packets for diagnostics. Generally speaking this is not suitable for long-term captures because of the potential performance degradation. This should be used for short-term troubleshooting only.
Warning: Routers are typically built for high-speed data-plane packet transfers. When capturing from a router you are pulling packets out of the high-speed data path and pushing them through the lower speed (lower resourced) control plane/management plane.
Living Off the Land: Firewalls
Similar to routers, most if not all, firewalls have a built-in packet capture capability. Some can even mirror traffic from one port to another. Again, this type of capture should be used for specific troubleshooting use cases and is not suitable for long term packet captures.
Note: If using Palo-Alto Firewalls and using tcpdump from the cli, by default it will only capture on the MGMT interface, not the data plane interfaces. Ask me how I know :D
Living Off the Land: Switches
SPAN ports, SPAN ports, SPAN ports.
To be clear, a SPAN port isn’t a tool to capture the packets, instead its part of the plumbing in the switch that duplicates the packets out an interface so you can capture them. Again, I won’t rehash the age old discussion of TAP vs. SPAN but if a SPAN is all you have, it’ll have to do. I am a fan of the SPAN. (<–I’m going to put that on a t-shirt) There are some cool things you can do with a SPAN port from a switch such as capturing an entire VLAN. This isn’t without it’s caveats, you can severely impact the performance of older switches, and you can over-subscribe the interface transmitting to your capture device. Also, incoming malformed frames aren’t duplicated but dropped on ingress to the switch. (<–If this was your issue you’d probably want to be able to see it). There was a really good article on packet-pushers blog about capturing from a switch that I think should be a must read.
There are lots of options when using a SPAN/mirror port and they differ from Vendor, model and software version.
WARNING: Over-subscription is your enemy when it comes to SPAN ports.
SPAN Port References
- Cisco:
no monitor session 1 default interface gi0/2 monitor session 1 source interface gi0/1 monitor session 1 destination interface gi0/2 - Juniper:
set interfaces ge-0/0/47 description "SPAN-PORT for Testing"
set interfaces ge-0/0/47 unit 0 family ethernet-switching

set forwarding-options analyzer SPAN_NAME input ingress vlan 10
set forwarding-options analyzer SPAN_NAME output interface ge-0/0/47.0
B.Y.O.T. (Bring Your Own Tools)
If you are capturing from a TAP, visibility sensor or directly from an end-point device like a workstation you’ll have the option of choosing the best tool for the job. You should choose the tool that has the features you need and runs efficiently on the system you’re using. Depending on your environment you might be in a situation where there’s only one tool available, like a linux environment without internet access to get new packages. In this case most linux distro’s include tcpdump. Some of the most common packet capture software are:
| Tool Name | OS | File Format | Capturing | Filtering | Reading |
|---|---|---|---|---|---|
| tcpdump | Linux | PCAP | Y | Y | Y |
| dumpcap | windows, *nix & mac | PCAPng | Y | Y | N |
| tshark | windows, *nix & mac | PCAPng | Y | Y | Y |
| Wireshark | windows, *nix & mac | Many | Y | Y | Y |
Basic Usage
tcpdump: tcpdump is very fast and uses bpf syntax for filters. The most simplest usage example is:
# Dump packet summary to stdout
tcpdump -i [interface_name]

# Write packets to PCAP file
tcpdump -i [interface_name] -w [filename.pcap]
dumpcap: This is the capture utility the Wireshark GUI uses when you’re capturing from an interface. A simple usage example:
# Write packets to PCAPng file
dumpcap -i [interface_name] -w [filename.pcapng]
tshark: This is the reading and filtering engine Wireshark GUI uses. This is a command line utility. A simple usage example is:
# Dump packet summary to stdout
tshark -i [interface_name]

# Write packets to PCAPng file
tshark -i [interface_name] -w [filename.pcapng]
Wireshark: The GUI application can be invoked via CLI as well:
# Write packets to PCAPng file
wireshark -i [interface_name] -w [filename.pcapng]
Pro-tip: Become fluent in the 3-above examples. You might be in a situation where its the only tool available and you have to make it work.
Final Thoughts
Like networking skills, your packet analysis skills will mature. The more you do it, the more you’ll learn. First you get familiar with the tools, then the process, then the analysis. Eventually, you’ll become syntacticly fluent in multiple tools, able to get packets out of any environment and analyze traffic from unknown network topologies, quickly.
Remember: Packet Acquisition is step #1 to Packet Analysis.
Moment of Truth: I’ve tried to describe all of the above in a very scientific and methodical way that will yield positive results. Sometimes scientific methods can take the fun out of it. How about you just start capturing with what ever you have and see what you get. Have fun! I know I will :D
Remember: If women don’t find you handsome, they should at least find you handy.
