How to Expand Partitions on Surface Pro
Modifying partitions on Surface Pro 5 using GParted.
Published on January 09, 2021 by Tony E.
surface pro gparted partitions
4 min READ
TL;DR
I couldn’t expand the Primary partition because there was another partition in the way. I needed to move the small partition before I could expand the primary.
Background
I had a Surface Pro 4 that suffered from the ‘Battery Swelling’ issue. My Surface Pro 4 had a 256GB storage. The Microsoft store replaced my product with the closest thing they had in stock which was a Surface Pro 5 with 512GB storage. They offerred to backup my data making a 1:1 copy of the entire storage of the Pro 4 and put it on the Pro 5. I returned the next day to pick up my new Surface Pro 5. Under the kickstand it has the “512GB” storage identifier but under “This PC” in file explorer it shows the “C:" drive as being only 256GB total. I checked the partition table using the windows tool and it showed another 256GB unallocated. I keep my storage pretty lean so this wasn’t an immediate concern but eventually I knew I needed to claim that unallocated space.
On the right side of the Primary “Windows” partition is a recovery partition. When this was copied over to a larger capacity sotrage it retained its size and capacity.
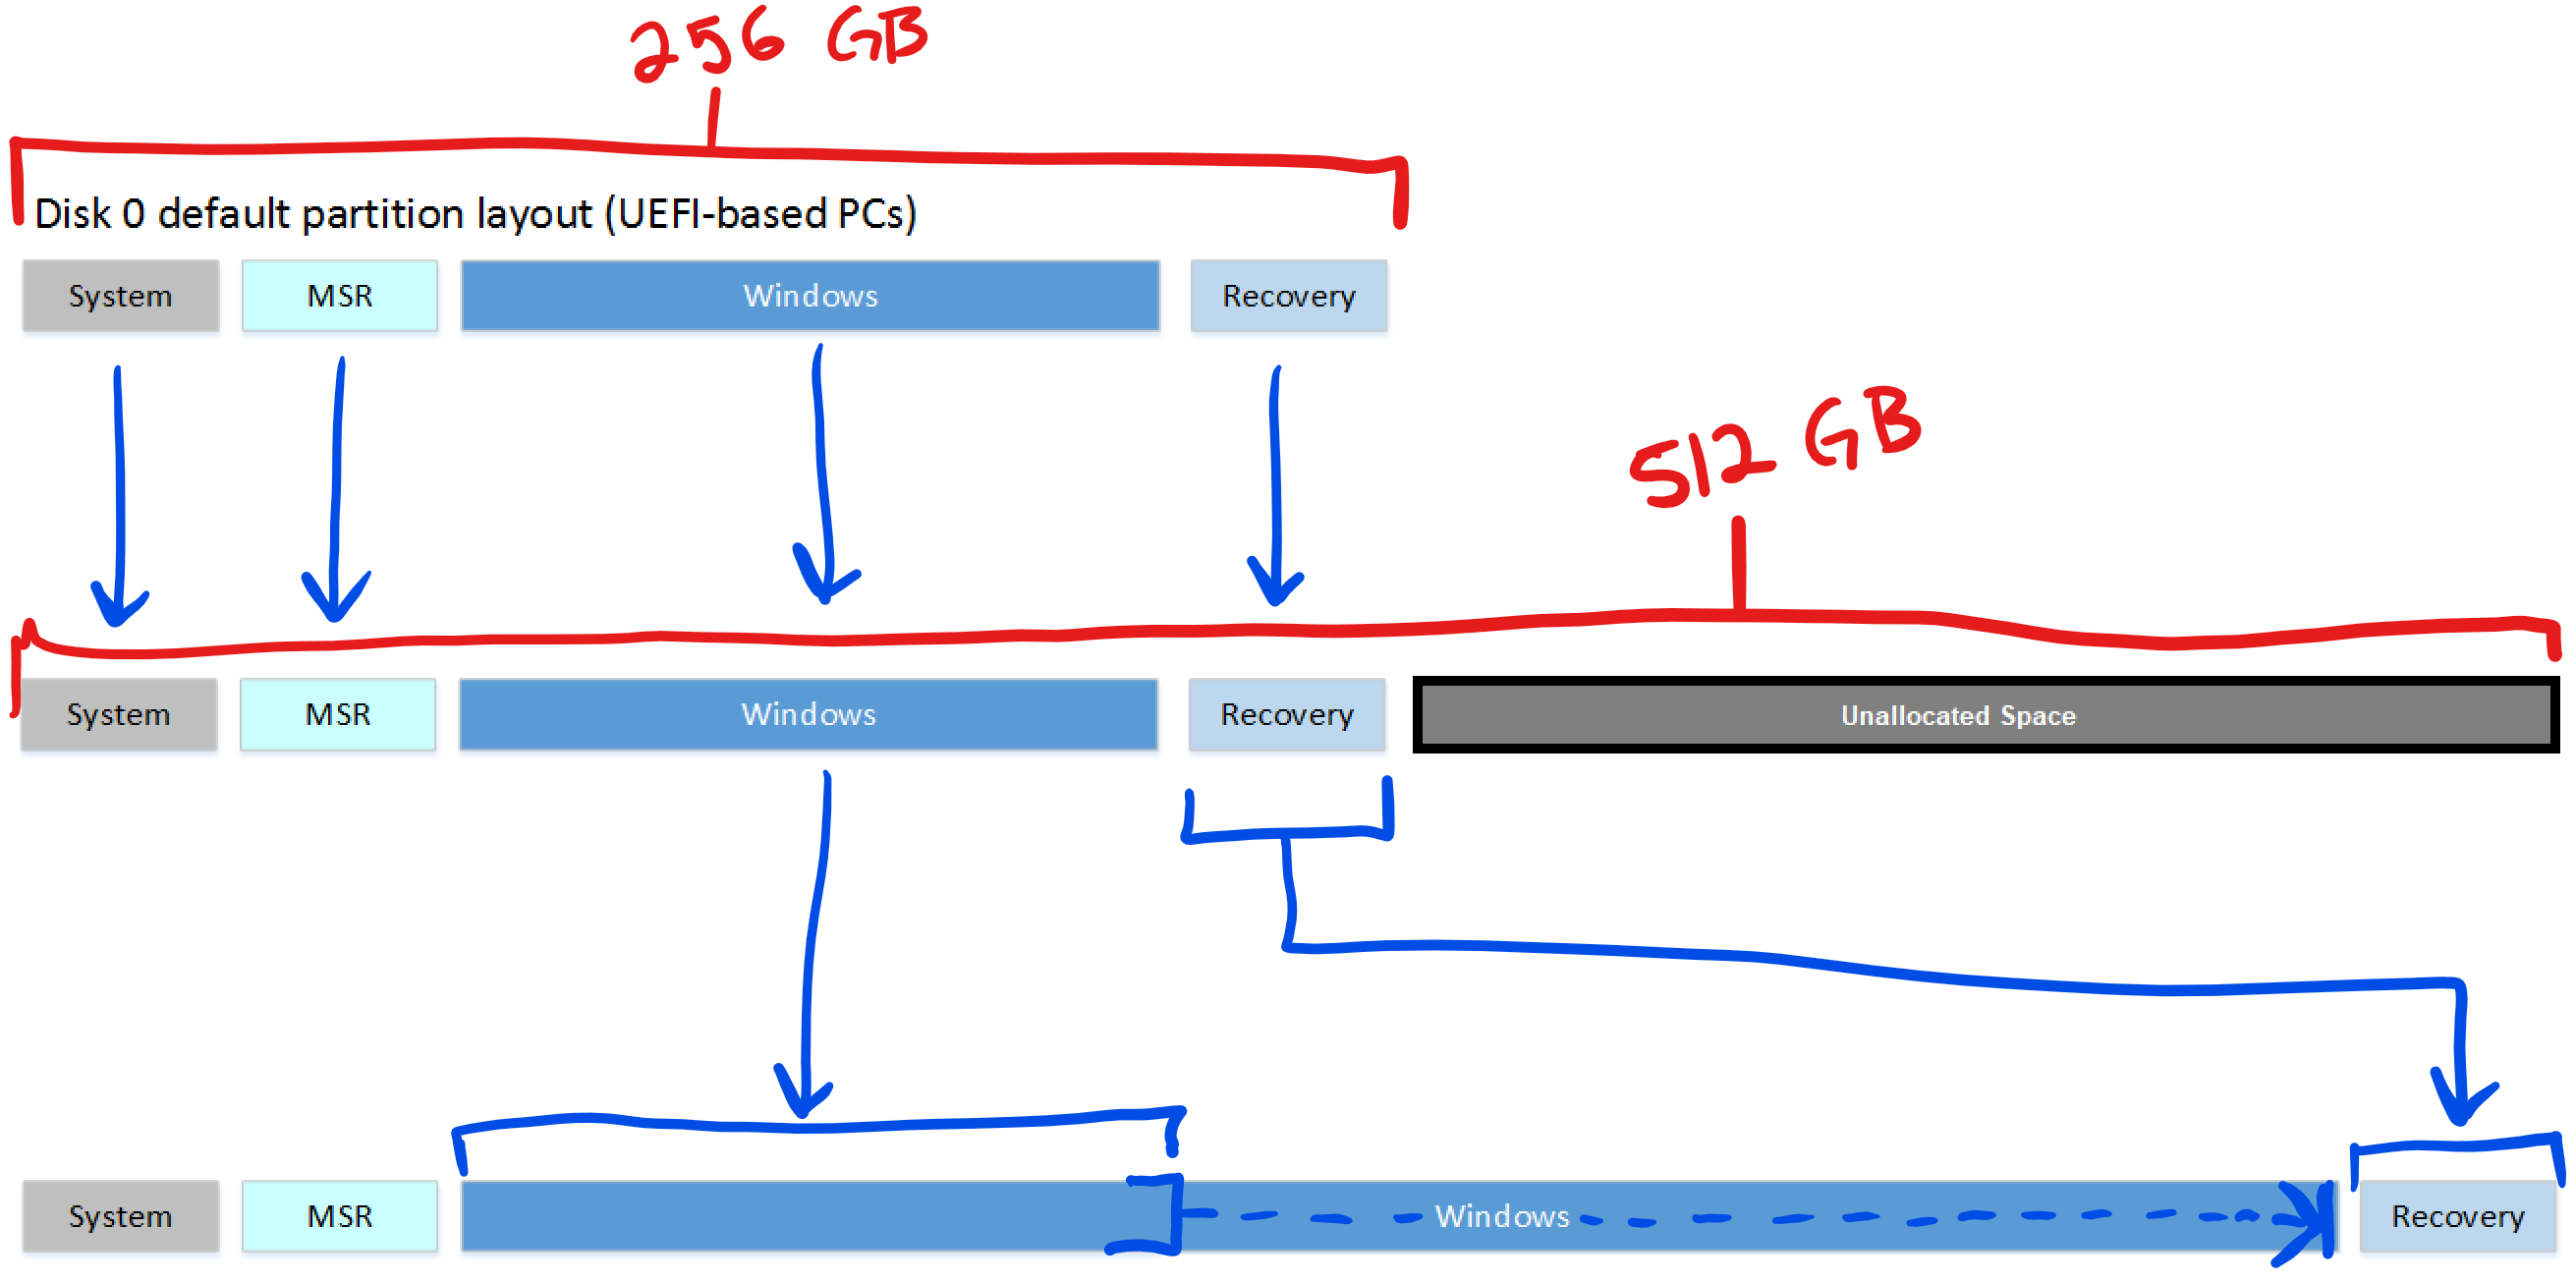
While it would’ve been very easy for me to right-click in the “Disk Management” tool in Windows, format the unallocated space creating a “D:" drive which was 256GB in size but I didn’t want that. I wanted the maximum allocatable space to all belong to the “C:" drive. This would require me to reloacte the “Recovery” partition all the way to the right of the entire disk, then expanding the Primary Windows Partition to claim the rest of the unallocated space.
I found this was best accomplished with a GUI utility because I wasn’t familiar with the available CLI options. All in all this process took about 10 minutes.
Materials
- Thumb Drive you can wipe
- GParted Live
WARNING: MAKE SURE YOU HAVE CURRENT FULL SYSTEM BACKUP BEFORE PROCEDING
Procedure
- Create the bootable thumb drive.
- I used the latest stable release for amd64 (iso file)
- I used Etcher for writting to the thumb drive
- Boot from the thumb drive.
- NOTE: Most guides will have you ‘turn off secure boot’, but I left “Secure Boot: on” and was able to complete everything.
- Shutdown and Power off your Surface Pro. DO NOT hibernate or sleep the device.
- Insert the thumb drive
- Hold down the Volume Down button while pressing and releasing the power button. I continued to hold the Volume Down button for a few more seconds then releasing it.
- You should see a black screen with boot text on it, instead of the usual Windows logo.
- You should be greated with the GParted Live boot menu. NOTE: The text is extremely small in this menu. I selected the top boot option which should be the default.
- Once in the live environment open “GParted”.
- Right-click the “Recovery Partition” and choose “Resize/Move”
- In the new pop-up hover the mouse over the small box representing the partition, your sursor should change to a “
 ” with arrows. Click and drag the small box representing the partition all the way to the right.
- The “Free space preceding (MiB)” should increase.
- The “New Size (MiB)” should remain the same.
- The “Free space following (MiB)” should decrease to “1” or “0”.
- Click the “Resize/Move” button to queue the changes.
- Now, right-click the large primary windows partition and choose “Resize/Move”.
- In the new window hove you cursor over the right-edge of the small box representing the partition. Your cursor should change to an “
 ”. Click and drag this edge all the way to the right.
- The “Free space preceding (MiB)” should remain the same.
- The “New Size (MiB)” should increase.
- The “Free space following (MiB)” should decrease to “1” or “0”.
- Click the “Resize/Move” button to queue the changes.
- Click on the Green Checkmark(
 ) in the main menu bar to commit the changes.
- Once complete, use the shutdown feature of GParted Live and shutdown the machine.
- Remove the thumb drive and reboot the Surface Pro. It should boot like normal.
After the computer completely rebooted, I openned file explorer, clicked on “This PC” and saw my disk was still showing “~256GB” total capacity. This was wrong, it should be ~512GB. I openned Disk Management, clicked on my Primary Windows partition and clicked “Refresh” from the drop down menu. This caused the Surface Pro to immediately bluescreen and go into Recovery Mode. This took about 1 - 2 minutes to recover. Once it was finished “rebuilding”, it rebooted again. I checked everything and I now had ~512GB full drive capacity available to me.

I’m not sure why this process caused the computer to jump to Recovery Mode. If you know, tell me.